
Table of Contents (Start)
- Topics
- Introducing SevOne
- Login
- Startup Wizard
- Dashboard
- Global Search - Advanced Search
- Report Manager
- Report Attachment Wizard
- Report Properties
- Report Interactions
- Instant Graphs
- TopN Reports
- Alerts
- Alert Archives
- Alert Summary
- Instant Status
- Status Map Manager
- Edit Maps
- View Maps
- FlowFalcon Reports
- NBAR Reports
- Logged Traps
- Unknown Traps
- Trap Event Editor
- Trap Destinations
- Trap Destination Associations
- Policy Browser
- Create and Edit Policies
- Threshold Browser
- Create and Edit Thresholds
- Probe Manager
- Discovery Manager
- Device Manager
- New Device
- Edit Device
- Object Manager
- High Frequency Poller
- Device Summary
- Device Mover
- Device Groups
- Object Groups
- Object Summary
- Object Rules
- VMware Browser
- Calculation Plugin
- Cisco ACI Plugin
- Database Manager
- Deferred Data Plugin
- DNS Plugin
- HTTP Plugin
- ICMP Plugin
- IP SLA Plugin
- JMX Plugin
- NAM
- NBAR Plugin
- Portshaker Plugin
- Process Plugin
- Proxy Ping Plugin
- SNMP Plugin
- VMware Plugin
- Web Status Plugin
- WMI Plugin
- xStats Plugin
- Indicator Type Maps
- Device Types
- Object Types
- Object Subtype Manager
- Calculation Editor
- xStats Source Manager
- User Role Manager
- User Manager
- Session Manager
- Authentication Settings
- Preferences
- Cluster Manager
- Maintenance Windows
- Processes and Logs
- Metadata Schema
- Baseline Manager
- FlowFalcon View Editor
- Map Flow Objects
- FlowFalcon Views
- Flow Rules
- Flow Interface Manager
- MPLS Flow Mapping
- Network Segment Manager
- Flow Protocols and Services
- xStats Log Viewer
- SNMP Walk
- SNMP OID Browser
- MIB Manager
- Work Hours
- Administrative Messages
- Enable Flow Technologies
- Enable JMX
- Enable NBAR
- Enable SNMP
- Enable Web Status
- Enable WMI
- IP SLA
- SNMP
- SevOne Data Bus
- Quality of Service
- Perl Regular Expressions
- Trap Revisions
- Integrate SevOne NMS With Other Applications
- Email Tips and Tricks
- SevOne NMS PHP Statistics
- SevOne NMS Usage Statistics
- Glossary and Concepts
- Map Flow Devices
- Trap v3 Receiver
- Guides
- SevOne Implementation Guide
- SevOne Best Practices Guide - Cluster, Peer, and HSA
- SevOne Installation Guide - Virtual Appliance
- SevOne NMS Installation Guide
- SevOne SAML Single Sign-On Setup Guide
- Access Control Quick Start Guide - SevOne NMS 5.7
- Data Miner Quick Start Guide - SevOne NMS 5.7
- Flow Quick Start Guide - SevOne NMS 5.7
- Group Aggregated Indicators Quick Start Guide - SevOne NMS 5.7
- IP SLA Quick Start Guide - SevOne NMS 5.7
- JMX Quick Start Guide - SevOne NMS 5.7
- LDAP Quick Start Guide - SevOne NMS 5.7
- Metadata Quick Start Guide - SevOne NMS 5.7
- RESTful API Quick Start Guide - SevOne NMS 5.7
- Self-monitoring Quick Start Guide - SevOne NMS 5.7
- SevOne NMS Admin Notifications Quick Start Guide - SevOne NMS 5.7
- SNMP Quick Start Guide - SevOne NMS 5.7
- Synthetic Indicator Types Quick Start Guide - SevOne NMS 5.7
- Topology Quick Start Guide - SevOne NMS 5.7
- VMware Quick Start Guide - SevOne NMS 5.7
- Web Status Quick Start Guide - SevOne NMS 5.7
- WMI Quick Start Guide - SevOne NMS 5.7
- xStats Quick Start Guide - SevOne NMS 5.7
SevOne Data Bus
SevOne Data Bus is a SevOne component that listens for new poll points for devices and publishes this data to an Apache Kafka broker or as of SevOne NMS 5.7.2.22, Apache Pulsar broker cluster. When poll points are detected, the SevOne REST API is used to enrich the data set with readable names and additional data prior to publishing to Kafka. SevOne Data Bus enables you to perform analyses by combining SevOne data with other types of data–for example IT and Business data. It allows you to stream real-time data from SevOne NMS to an external message bus. Any application capable of integrating with Apache Kafka can subscribe to the data published.
As of SevOne NMS 5.7.2.7, SevOne Data Bus will follow the same versioning convention as SevOne NMS i.e. SevOne Data Bus 5.7.2.7. In order to use SevOne Data Bus, you will need to purchase the license for it. For more information, talk to your Technical Account Manager (if applicable) or SevOne's Sales Engineering team.
SevOne Data Bus uses Kafka Client library version 2.5.0 for publishing data to the Kafka broker. Please visit
https://kafka.apache.org/0102/documentation.html
to determine compatibility of SevOne Data Bus with Kafka broker versions.
Configure, Start, and Stop SevOne Data Bus
Install the SevOne Data Bus License
Before starting SevOne Data Bus, you'll need to install the SevOne Data Bus license on each peer that you plan to run it on. Perform the following steps.
-
Log on to SevOne NMS.
-
From the navigation bar, click Administration and select About.
-
On the right side of the page, click Update License to go to the Appliance Licence tab in the Cluster Manager.
-
Under Upload a New License File, click
 to display the file upload pop-up.
 -
Navigate the file structure to locate the license.
-
Select the license file and click Open.
-
Click Upload to upload the license.
-
Repeat the steps above for any additional peers that you plan to run SevOne Data Bus on.
Configure and Start SevOne Data Bus
Perform the following steps to configure and start SevOne Data Bus. You will need to do this for each peer in your cluster. Once you configure the application.conf file on the first peer, simply copy the file to each additional peer in the cluster.
You will need to have a license for SevOne Data Bus in order to enable it. Without a valid license, the process will exit.
-
SSH into your SevOne NMS appliance or cluster. If you SSH in as root, it's not necessary to use sudo with commands.
If you don't SSH in as root, you will need to precede commands with sudo.
-
Copy application.conf.template in /etc/sevone/data-bus to application.conf.
If upgrading from an earlier version of SevOne Data Bus, make sure to backup prior the application.conf file before applying the SevOne Data Bus 1.4 template and update accordingly.
-
Using the text editor of your choice, open application.conf in /etc/sevone/data-bus.
-
For SevOne NMS REST API settings, configure the following under api:
-
api
-
authentication
-
username - The SevOne NMS user name. This should be for an admin account.
-
password - The corresponding SevOne NMS password.
-
-
-
-
For the SevOne Data Bus output format, configure the following under databus:
-
databus
-
output
-
format - The data output format, which can be either avro or json.
-
-
-
-
To filter SevOne Data Bus output, configure the information below under filters. This is an array of filters, and there are rules for each filter.
Starting SevOne Data Bus 5.7.2.7, both whitelist and blacklist filtering are supported. Backward compatibility is kept into consideration - either the latest configuration file can be adopted or the old configuration file can be updated. To update the old configuration file, add a new section, exclude-filters, at the same level as filters to enable blacklist filtering.
In latest configuration file, there are two separate sections:
- include-filters for whitelist filter rules
- exclude-filters for blacklist filter rules-
filters - The array of filters. Configure the following information for each filter you would like to add.
Filtering on device groups and/or object groups with large membership counts can result in timeout errors in the cache.
-
name - The name of the filter.
-
rules - Configure the following rules for each filter. You can configure all four of the following IDs for any number of rows. A value of -1 represents any ID. A data point matches a row if it matches all of the IDs in that row. A data point is included when it matches any of the rows. If you have both whitelist and blacklist, and there are overlapping rules in both list, then the blacklist will take the dominant position. If a row has -1 for all IDs, then nothing will be excluded. You can get IDs for the items listed below using the SevOne NMS REST API. For more information, see the SevOne NMS RESTful API Quick Start Guide.
-
devGrpID - The device group ID.
-
objGrpID - The object group ID.
-
devID - The device ID.
-
objID - The object ID.
Examples of rules# Filters for the Data Bus output# Note: SDB only exports data from the local peer, so these filters only apply to local data.filters = [{name ="default"# Specify your filters as different elements in this array# by specifying an ID that you would like to be included.# A value of -1 is interpreted as any ID.# Each column in a given filter is combined with logical AND.# Multiple filters are combined with logical OR.rules = [# Example: Include everything{devGrpID = -1, objGrpID = -1, devID = -1, objID = -1}# Example: Include only devices 5 and 6# {devGrpID = -1, objGrpID = -1, devID = 5, objID = -1},# {devGrpID = -1, objGrpID = -1, devID = 6, objID = -1}# Example: Include device 5 only if it's in device group 2 and device 6# {devGrpID = 2, objGrpID = -1, devID = 5, objID = -1},# {devGrpID = -1, objGrpID = -1, devID = 6, objID = -1}# Example: Include only objects 2, 3, and 4 from device 5# {devGrpID = -1, objGrpID = -1, devID = 5, objID = 2},# {devGrpID = -1, objGrpID = -1, devID = 5, objID = 3},# {devGrpID = -1, objGrpID = -1, devID = 5, objID = 4}]}]exclude-filters = [{name ="black-list"# Specify your filters as different elements in this array# by specifying an ID that you would like to be included.# A value of -1 is interpreted as any ID.# Each column in a given filter is combined with logical AND.# Multiple filters are combined with logical OR.rules = [# Example: Exclude everything{devGrpID = -1, objGrpID = -1, devID = -1, objID = -1}# Example: Include only devices 5 and 6# {devGrpID = -1, objGrpID = -1, devID = 5, objID = -1},# {devGrpID = -1, objGrpID = -1, devID = 6, objID = -1}# Example: Exclude device 5 only if it's in device group 2 and device 6# {devGrpID = 2, objGrpID = -1, devID = 5, objID = -1},# {devGrpID = -1, objGrpID = -1, devID = 6, objID = -1}# Example: Exclude only objects 2, 3, and 4 from device 5# {devGrpID = -1, objGrpID = -1, devID = 5, objID = 2},# {devGrpID = -1, objGrpID = -1, devID = 5, objID = 3},# {devGrpID = -1, objGrpID = -1, devID = 5, objID = 4}]}] -
-
-
-
You can configure multiple Kafka brokers or Pulsar brokers, exclusively, as output destinations. As of SevOne NMS 5.7.2.22, Apache Pulsar brokers is also supported. With support for Pulsar added, SevOne Data Bus is compatible with all the old configurations and the configuration of Kafka remains the same. Under output -> publishers, configure the settings below for each publisher you would like to add. Default producer configurations shared by all publishers are also included here (output -> default -> producer).
-
output
-
default
Applies to Kafka or PulsarThe default section contains producer configurations shared by all publishers. These default configurations are overwritten by the settings you specify for each publisher. You can modify the following default producer settings or modify/add any other valid Kafka or Pulsar producer configuration in addition to the ones below.
-
producer - A list of the Kafka producer configuration settings.
-
acks - The number of acknowledgements that the leader must receive before a request is considered complete. Options include 0, 1, and -1. -1 will wait until all of the replicas (cluster members that are replicating the partition) acknowledge the message. For this reason, -1 is considered to be the most robust, albeit slowest, option.
-
retries - The number of times to retry sending a failed message.
-
linger.ms - The amount of time in milliseconds for messages to remain in the producer queue before message batches are created.
-
batch.size - The number of messages batched into a MessageSet.
-
request.timeout.ms - The amount of time in milliseconds that the client will wait for a request response.
-
max.in.flight.requests.per.connection - The maximum number of unacknowledged requests sent to a broker.
-
-
pulsar-producer - A list of Pulsar producer configuration settings.
-
batchingMaxMessages - The maximum number of batched message for Pulsar producer.
-
sendTimeoutMs - The number in milliseconds for which Pulsar will wait to report an error if a message is not acknowledged by the server.
-
-
-
publishers - The array of publishers. Configure the following information for each publisher that you would like to add.
-
Common Settings (for Kafka or Pulsar)
-
name - The name of the default publisher.
-
filters - The array of filters to include for the publisher. Filters should be listed within [ ... ]. Combine results from multiple filters using logical OR.
-
topic - The Kafka or Pulsar topic that SevOne Data Bus writes to. This can be anything you want. For example, "sdb".
-
isLive - The current publisher accepts historical data only when set to false.
-
type - The type of this publisher. If not set, SevOne Data Bus will set the default value as kafka for this field. To export to Pulsar, user must explicitly set this field to pulsar.
-
-
Kafka-specific Settings
-
producer - Configure the following information for the producer.
-
bootstrap.servers - The Kafka server, also known as a broker, and the port number for accessing the server. Use the format {server IP address or hostname}:{port number}. For example, "10.129.13.10:9092".
-
-
-
Pulsar-specific Settings
-
client - Configure the following for Pulsar client. Please refer to https://pulsar.apache.org/docs/en/client-libraries-java/ for available settings.
-
serviceUrl - The service URL of Pulsar.
-
connectionTimeoutMs - Duration to wait for a connection to a broker to be established.
-
useTls - Set to true. For example, useTls=true.
-
tlsTrustCertsFilePath - Set to "/path/to/ca.cert.pem". For example, tlsTrustCertsFilePath="/path/to/ca.cert.pem".
-
tlsAllowInsecureConnection - Set to true. For example,tlsAllowInsecureConnection=true.
-
authPluginClassName - Authorized plugin class name. For example, authPluginClassName= "org.apache.pulsar.client.impl.auth.AuthenticationTls"
-
-
tenant - Pulsar service tenant name.
-
namespace - Pulsar service namespace.
-
topic-type - Can be set to "persistent" or "non-persistent".
-
producer - Please see the table below fo Pulsar producer settings.
Pulsar Producer
Description
Values
messageRoutingMode
Set the MessageRoutingMode for a partitioned producer. Please refer to the following link for details.
-
"SingelPartition"
-
"RoundRobinPartition"
compressionType
Set the compression type for the producer.
-
"NONE"
-
"LZ4"
-
"ZLIB"
-
"ZSTD"
-
"SNAPPY
autoUpdatePartitions
If enabled, partitioned producer will automatically discover new partitions at runtime.
[Boolean](true)
batchingEnabled
Enable Batching.
[Boolean](false)
batchingMaxMessages
Set the maximum number of messages permitted in a batch.
[Int](1000)
blockIfQueueFull
Set whether the send operations should block when the outgoing message queue is full. Please refer to the following links for details.
[Boolean](false)
maxPendingMessages
Set the maximum size of the queue holding the messages pending to receive an acknowledgment from the broker.
[Int](500000)
hashingScheme
Change the HashingScheme used to chose the partition on where to publish a particular message. Please refer to the following link for details.
-
"JavaStringHash"
-
"Murmur3_32Hash"
The [String] in the table above means that you can put any value of that type in there. The value inside () is the default value for the setting.
-
-
-
-
-
-
Tomonitor SevOne Data Bus data processing, configure the following http and/or https settings under status:
-
status
-
http
-
enabled - Whether the http status page is enabled (true) or disabled (false).
-
port - The port that the SevOne Data Bus status page runs on. The default port is 8082.
-
-
https
-
enabled - Whether the https status page is enabled (true) or disabled (false).
-
secure_port - The secure port that the SevOne Data Bus status page runs on. The default port is 8443.
-
private_key_password - The private key password.
-
keystore_password - The keystore password.
-
keystore_path - The path to the keystore. The default is "/etc/sevone/data-bus/sdb.keystore".
-
-
-
-
Save and close the file.
-
If you have a cluster, make sure to copy the configured application.conf file to each peer in the cluster (to the directory /etc/sevone/data-bus).
-
Execute one of the following commands to add SevOne Data Bus to the default runlevel. This ensures that SevOne Data Bus will restart after a system reboot. If you don't add SevOne Data Bus to the default runlevel, you'll need to manually restart SevOne Data Bus after rebooting.
-
Gentoo SevOne NMS:
rc-update add sevone-data-bus default -
CentOS SevOne NMS:
/usr/bin/supervisorctlupdate
-
-
Execute the following command to adjust the SevOne Data Bus configuration for your PAS size. Replace {PAS_SIZE} with pas300k, pas200k, pas60k, pas40k, pas20k, pas10k, or pas5k. SevOne Data Bus will start when you run this command.
SevOne-selectdata-bus appliance {PAS_SIZE}
Configure SevOne Data Bus to Start on Reboots
After you have configured the application.conf, perform the following steps to ensure that SevOne Data Bus starts on reboots. This applies only if you have SevOne NMS running on CentOS. This step does not apply if SevOne NMS is running on Gentoo.
If you don't SSH in as root, you will need to precede commands with sudo.
-
Using the text editor of your choice, open SevOne-data-bus.ini in /etc/supervisord.d/.
-
In the following line, change false to true:
autostart=false -
Save and close the file.
-
Execute the following command:
/usr/bin/supervisorctl update
Restart SevOne Data Bus
Any time you make changes to the SevOne Data Bus configuration after the inititial configuration, you'll need to restart SevOne Data Bus using one of the the following commands:
Gentoo SevOne NMS:
/etc/init.d/sevone-data-bus restartCentOS SevOne NMS:
/usr/bin/supervisorctl restart SevOne-data-busOptional Configurations
The following configurations are optional.
Publish Metrics in Confluent Control Center
To publish metrics in Confluent Control Center, follow the instructions for adding producer/consumer interceptors to the client configuration at https://docs.confluent.io/current/control-center/docs/installation/clients.html#interceptor-installation.
After you have done that, you will need to add the Confluent interceptor classes to the application.conf file. Under output -> default -> producer, add the line below.
-
output
-
default
-
producer - Add the following line:
interceptor.classes = “io.confluent.monitoring.clients.interceptor.MonitoringProducerInterceptor”
-
-
Validate and Register Schema with Confluent Schema Registry
SevOne Data Bus will validate and register the schema with the Confluent schema registry when it starts. To enable this feature, you will need to add the schema registry server URL to the application.conf file.
Add the URL to the following line under schema-registry in the application.conf file. Replace SCHEMA_REGISTRY_SERVER_HOST with the server host name or IP address and SCHEMA_REGISTRY_SERVER_PORT with the server port.
To enable this, you will need to remove the # that preceds url at the beginning of the line.
url: "SCHEMA_REGISTRY_SERVER_HOST:SCHEMA_REGISTRY_SERVER_PORT"You can also configure the subject name for the schema in the following line. Replace the default subject name, sevone-sdb, with your new subject name within the quotes.
subject: "sevone-sdb"If the compatibility validation fails or an exception is thrown during validation, SevOne Data Bus will terminate.
Map Devices to a Specific Kafka Partition
SevOne Data Bus supports Kafka partitions based on the key field. A key is composed of key fields (key-fields) and a key delimiter (key-delimiter). Kafka will handle the message distribution to different partitions based on the key and will ensure that messages with the same key go to the same partition.
Under kafka, for key-fields, change ["deviceId", "objectId"] to ["deviceId"]. This is necessary for mapping devices to a specific partition.
key-fields: ["deviceId", "objectId"]Add Configuration for SSL Authentication
SevOne Data Bus supports SSL authentication. Before continuing, you will need to enable SSL for Kafka by following the configuration steps at https://kafka.apache.org/0102/documentation.html#security_ssl.
After you have done that, you will need to add the SSL parameters to the application.conf file. Under kafka, in the producerConfig section, add the following lines. For ssl.keystore.location, replace /var/private/ssl/kafka.client.keystore.jks, with the location of the key store file. For ssl.keystore.password, replace test1234 with the password for the key store file. For ssl.key.password, replace test1234 with the password for the private key in the key store file.
ssl.keystore.location=/var/private/ssl/kafka.client.keystore.jksssl.keystore.password=test1234ssl.key.password=test1234Add Configuration for Kerberos Authentication
SevOne Data Bus supports Kerberos authentication. Before continuing, you will need to configure Kerberos authentication by following setup instructions at https://kafka.apache.org/0102/documentation/#security_sasl.
After you have done that, you will need to add the following line to the application.conf file under kafka, in the producerConfig section. Replace /path/to/kafka/client/ with the path to the Kafka client. Then replace {hostname} with the hostname or IP address of the Kafka client.
sasl.jaas.config: "com.sun.security.auth.module.Krb5LoginModule required useKeyTab=true storeKey=true keyTab=\"/path/to/kafka/client/keytab\" principal=\"kafka-client-1/{hostname}@TEST.COM\";"Stop SevOne Data Bus
To stop SevOne Data Bus, execute one of the following commands:
Gentoo SevOne NMS:
/etc/init.d/sevone-data-bus stopCentOS SevOne NMS:
/usr/bin/supervisorctl stop SevOne-data-busCommon Administrative Tasks
View Logs
You can find SevOne Data Bus logs in /var/log/SevOne-data-bus. The current log is data-bus.log. Previous logs are rolled up as data-bus.{yyyy-mm-dd}.{#}.log (for example, data-bus.2017-10-14.1.log), where # is the number of rolled up logs for the specified date.
Configure Logs
Perform the following steps to configure log files.
-
Using the text editor of your choice, open logback.xml in /etc/sevone/data-bus.
-
To change the file name format, edit the following line. You can replace data-bus with a new name and change the current date format, yyyy-MM-dd, to a different date format.
<fileNamePattern>${logDir}/data-bus.%d{yyyy-MM-dd}.%i.log</fileNamePattern> -
To change the log rollup, edit one or more of the following settings. By default, logs are rolled up at least once per day–more often if files exceed the maximum file size.
-
Maximum file size. Replace {file size} with the desired file size.
<maxFileSize>{filesize}</maxFileSize> -
Maximum number of logs to roll up. Replace {number} with the desired number of logs.
<maxHistory>{number}</maxHistory> -
Total size of the rollup file. Replace {total size} with the desired size.
<totalSizeCap>{total size}</totalSizeCap>
-
-
To change the log level, edit the following line. Replace {level} with TRACE, DEBUG, INFO, WARN, or ERROR.
<root level="{level}"> -
Save and close the file.
Check the SevOne Data Bus Status Page
Execute the following command to check the system throughput using the SevOne Data Bus status page. You'll need to provide the hostname or IP addres of the SevOne NMS appliance or cluster as well as the port number that the SevOne Data Bus status page runs on. The status page is only available when it's enabled and the port it runs on is defined. You can configure these settings in the status entry of the application.conf file (see Configure and Start SevOne Data Bus). Details for all metrics can be found in https://kafka.apache.org/documentation.html.
$ wget {SevOne NMS hostname or IP address}:{port number}/statusFor example:
$ wget 10.128.18.52:8082/statusSevOne Data Bus and SevOne Data Cloud
To establish data transfer from SevOne NMS to SevOne Data Cloud using SDB as an interface, execute the following steps.
Obtain API Token
-
Go to the SevOne Data Cloud page at http://<SevOne Data Cloud>/api/key/. Replace <SevOne Data Cloud> with the hostname or IP address of your SevOne Data Cloud.
-
Save the API key it returns.
Example: https://cloud.sevone.com/api/keyP5ALkFQ4UA4MTDYu02oODzQ4o2De02_2PaPYXN6bbLs
Enable and Configure Internal Datad/Kafka NMS Subscription
To enable and configure the internal Datad/Kafka NMS Subscription between SevOne Data Bus and SevOne Data Cloud, the following configuration must be added in /etc/sevone/data-bus/application.conf.
# Configure the datad/kafka connection information nms { kafka { url = "127.0.0.1:9092" group = "sdb_group" serverProperties = "/etc/kafka/kafka-server.properties" } }This configuration should not be changed unless if you are running the internal Kafka on a different port. In that case, you must modify only the url config entry in this configuration.
publishers = [ { # Publisher name will be used to distinguish each publisher in the status page # SDB will assign a name for unnamed publishers in the format "publisher-X", # where X is the numerical index of unnamed publishers. name = "dataEngine" type = "dataEngine" project = "<your-SDB-project>" transport = "de-grpc" logLevel = "DEBUG" grpcHost = "cloud.sevone.com" grpcPort = "443" grpcToken = "P5ALkFQ4UA4MTDYu02oODzQ4o2De02_2PaPYXN6bbLs" grpcTokenType = "apikey" grpcTls = true grpcInsecureTls = true grpcCertPath = "" grpcTlsServerName = "" grpcClientCertPath = "" grpcClientKeyPath = "" collectorName = "SDB" projectId = "<your-Data-Cloud-project-id>" # Multiple filters are combined with logical AND. filters = [ "default" ] topic = "sdb" # Kafka producer configuration options. # See https://kafka.apache.org/documentation, section 3.3 Producer Configs producer { # If bootstrap.servers is not defined, SDB will look for the bootstrap.servers # defined in output.default.producer. #bootstrap.servers = "kafka:9092" } } ]project is for SDB project.
project-id is for Data Cloud project. Value must be in lower-case only and with no spaces. Hyphens are allowed.
Assign the value Obtain API Token step returns to grpcToken as shown in the example above.
Enable OpenTracing
Starting SevOne NMS 5.7.2.24, SevOne Data Bus supports OpenTracing. Using a text editor of your choice, ddd the following to /etc/sevone/data-bus/application.conf file. All Jaeger environment options are supported.
opentracing { JAEGER_DISABLED = "false" JAEGER_SAMPLER_TYPE = "const" JAEGER_SAMPLER_PARAM = "1" JAEGER_SERVICE_NAME = "SDB" JAEGER_PROPAGATION = "b3" JAEGER_AGENT_HOST = "localhost" JAEGER_AGENT_PORT = "6831"}$ supervisorctl start jaegerSevOne Data Bus Historical Backfill
Overview
This feature will enable you to republish historical data from a specified time period through sending a POST request using the REST API endpoint. Both start time and end time is formatted in Unix timestamp in seconds. This feature is introduced in SevOne Data Bus 1.4 version, in which modifications to the configuration file are required.
Use Cases
The ability to backfill data in case something goes wrong (communication issues with Kafka cluster, etc.) and have that data sent across the same Kafka setup as you do for polled data.
Configuration
To enable backfill data, an external broker must be set up to receive historical data and SevOne Data Bus must be able to distinguish this broker from others. The logic of the implementation is to add a flag into the historical broker setting to enable SevOne Data Bus to recognize it. The modifications of configurations are listed below.
As of SevOne NMS 5.7.2.23, republish actor has been refactored so that it will not overload the system while republishing. New configuration backfillSleepTime has been added to republish data. This will allow the republish actor to take a rest between republishing of each indicator.
Application.conf
api = ${api} nms = ${nms} # Configure the Data Bus output format databus = ${databus} # Configure the settings for Schema Registry server if needed schema-registry = ${schema-registry} # Filters for the Data Bus output # Note: SDB only exports data from the local peer, so these filters only apply to local data. filters = ${filters} # Output configuration output = ${output} status = ${status} akka = ${akka}DATABUS { api = ${api} nms = ${nms} # Configure the Data Bus output format databus = ${databus} # Configure the settings for Schema Registry server if needed schema-registry = ${schema-registry} # Filters for the Data Bus output # Note: SDB only exports data from the local peer, so these filters only apply to local data. filters = ${filters} # Output configuration output = ${output} status = ${status}} akka = ${akka}# Historical data is republished indicator based, this setting controls how long republish actor will sleep before republishing next indicator# It should be added inside databus section inside DATABUS block in application.conf for version after 1.4# Added to databus section in conf file for version before 1.4DATABUS { ...... databus { ...... backfillSleepTime = 0 # millisecond ....... } ......}Kafka Configurations
For historical data broker, you need to add an isLive flag and set the value to false to let SevOne Data Bus recognize this historical broker. The rest of the configuration is the same as others.
output { default { logNthException: 50000 key-fields = ["deviceId", "objectId"] key-delimiter = ":" # Kafka producer configuration options. producer { acks = "-1" retries = "0" linger.ms = "10" batch.size = "1000000" request.timeout.ms = "60000" max.in.flight.requests.per.connection = "2" } } publishers = [ { name = "default-producer" filters = [ "default" ] topic = "sdb" producer { bootstrap.servers = "localhost:9092" } }, { name = "historical-producer" filters = [ "default" ] topic = "historicalData" isLive = false producer { bootstrap.servers = "localhost:9092" } }, ]}Pulsar Configurations
# Output configurationoutput { # Default settings for publishers, which can be overwritten by eachpublisher default { # Publisher types: # kafka, pulsar # Default to be kafka type = "pulsar" # When publish errors occur log only every Nth consecutive exception # Default to be 50000 logNthException: 50000 # Customerize the message key format if needed. Available fields include: # deviceId, deviceName, deviceIp, peerId, objectId, objectName, # objectDesc, pluginId, pluginName, indicatorId, indicatorName, # format, value, time, clusterName, peerIp # Default format is "deviceId:objectId". key-fields = ["deviceId", "objectId"] key-delimiter = ":" # Put comment settings for pulsar-producer in this section, please check the table below for available configs pulsar-producer { batchingMaxMessages = 100000 # millisecond sendTimeoutMs = 30000 #millisecond } } publishers = [ { # Publisher name will be used to distinguish each publisher in the status page # SDB will assign a name for unnamed publishers in the format "publisher-X", # where X is the numerical index of unnamed publishers. name = "pulsar-producer" # This field is important type = "pulsar" # Multiple filters are combined with logical AND. filters = [ "default" ] tenant = "public" namespace = "default" topic = "sdb-pulsar" topic-type = "persistent" # Pulsar client configuration options. # Check https://pulsar.apache.org/docs/en/2.4.2/client-librariesjava/ for references. client { serviceUrl = null connectionTimeoutMs = "10000" useTls = true tlsTrustCertsFilePath = "/path/to/ca.cert.pem" tlsAllowInsecureConnection = true authPluginClassName = "org.apache.pulsar.client.impl.auth.AuthenticationTls" } } ]}Usage
|
HTTP Method |
End Point |
Parameter |
Purpose |
|
POST |
PORT: port number of http server Start time: Unix timestamp in seconds End time: Unix timestamp in seconds |
Republish data for a given time period |
The usage of this feature can be accomplished through the bash script RepublishHistoricalData.sh provided in SevOne Data Bus. You will only need to run the script along with start time and end time as two independent parameters. For example:
./RepublishHistoricalData.sh 1519000000 1520000000You are also able to use third-party tools such as Postman to send the request to the http server of SevOne Data Bus .
Performance
Example: A CentOS box used for testing with the following environment setup.
|
CPU |
# of CPU |
Memory |
Swap Memory |
Devices |
Objects |
Indicators |
|
Intel E5-2680@ 2.70GHz |
32 |
252GB |
15.6GB |
1001 |
200101 |
4000578 |
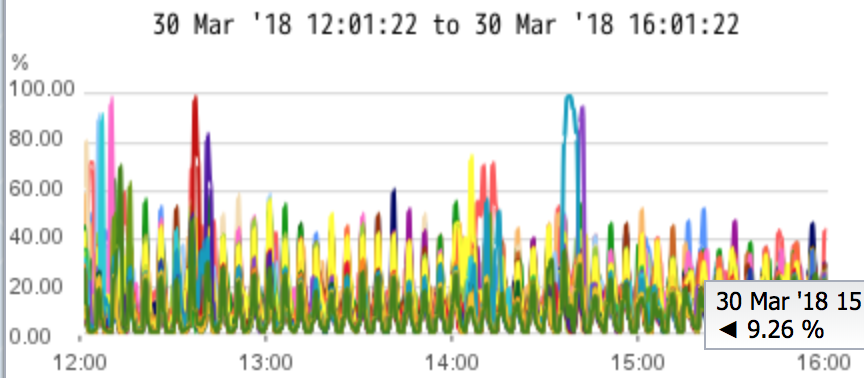
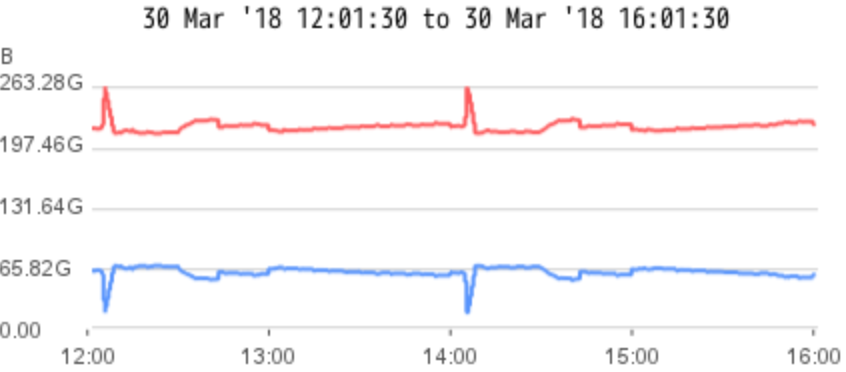
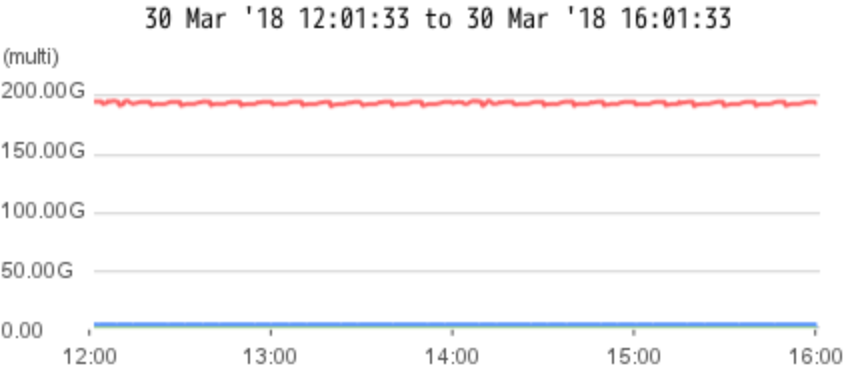
Due to the restriction of the REST API(Approx 20-50ms response time for each query), the maximum throughput for retrieving indicator data is 50 indicators per second. The system load is monitored while doing republishing, CPU utilization is around 60-80% , free memory is about 65GB of 252GB .
User Manual
-
Add a Kafka publisher in /etc/sevone/data-bus/application.conf, add a field called isLive inside this publisher and set it to false.
{name ="default-producer"filters = ["default"]isLive =falsetopic ="historical data"producer {bootstrap.servers ="localhost:9092"} -
Find the script called RepublishHIstoricalData.sh provided in the scripts folder. Make it executable using the following command in the scripts folder.
chmod755./RepublishHistoricalData.sh -
Execute the script along with two timestamps - denote the start time and end time. Each timestamp should be a Unix timestamp in seconds, the command looks like below.
Bash Command./RepublishHistoricalData.sh [STARTTIME] [ENDTIME]Example:./RepublishHistoricalData.sh15190000001520000000The end time must be a timestamp from at least one hour ago compared to the current time.
-
Currently, the republish actor blocks the current job until it completes. If you want to stop the current job, then execute the following command.
./RepublishHistoricalData.sh stop
SevOne Data Bus JMX Plugin
Overview
This feature enables you to retrieve runtime metrics of SevOne Data Bus through JMX indicators in SevOne NMS system. It utilizes the JMX module in SevOne polld, and all the data polled also gets pushed to external Kafka brokers for later use. This feature is introduced in SevOne Data Bus 1.4 version .
Use Cases
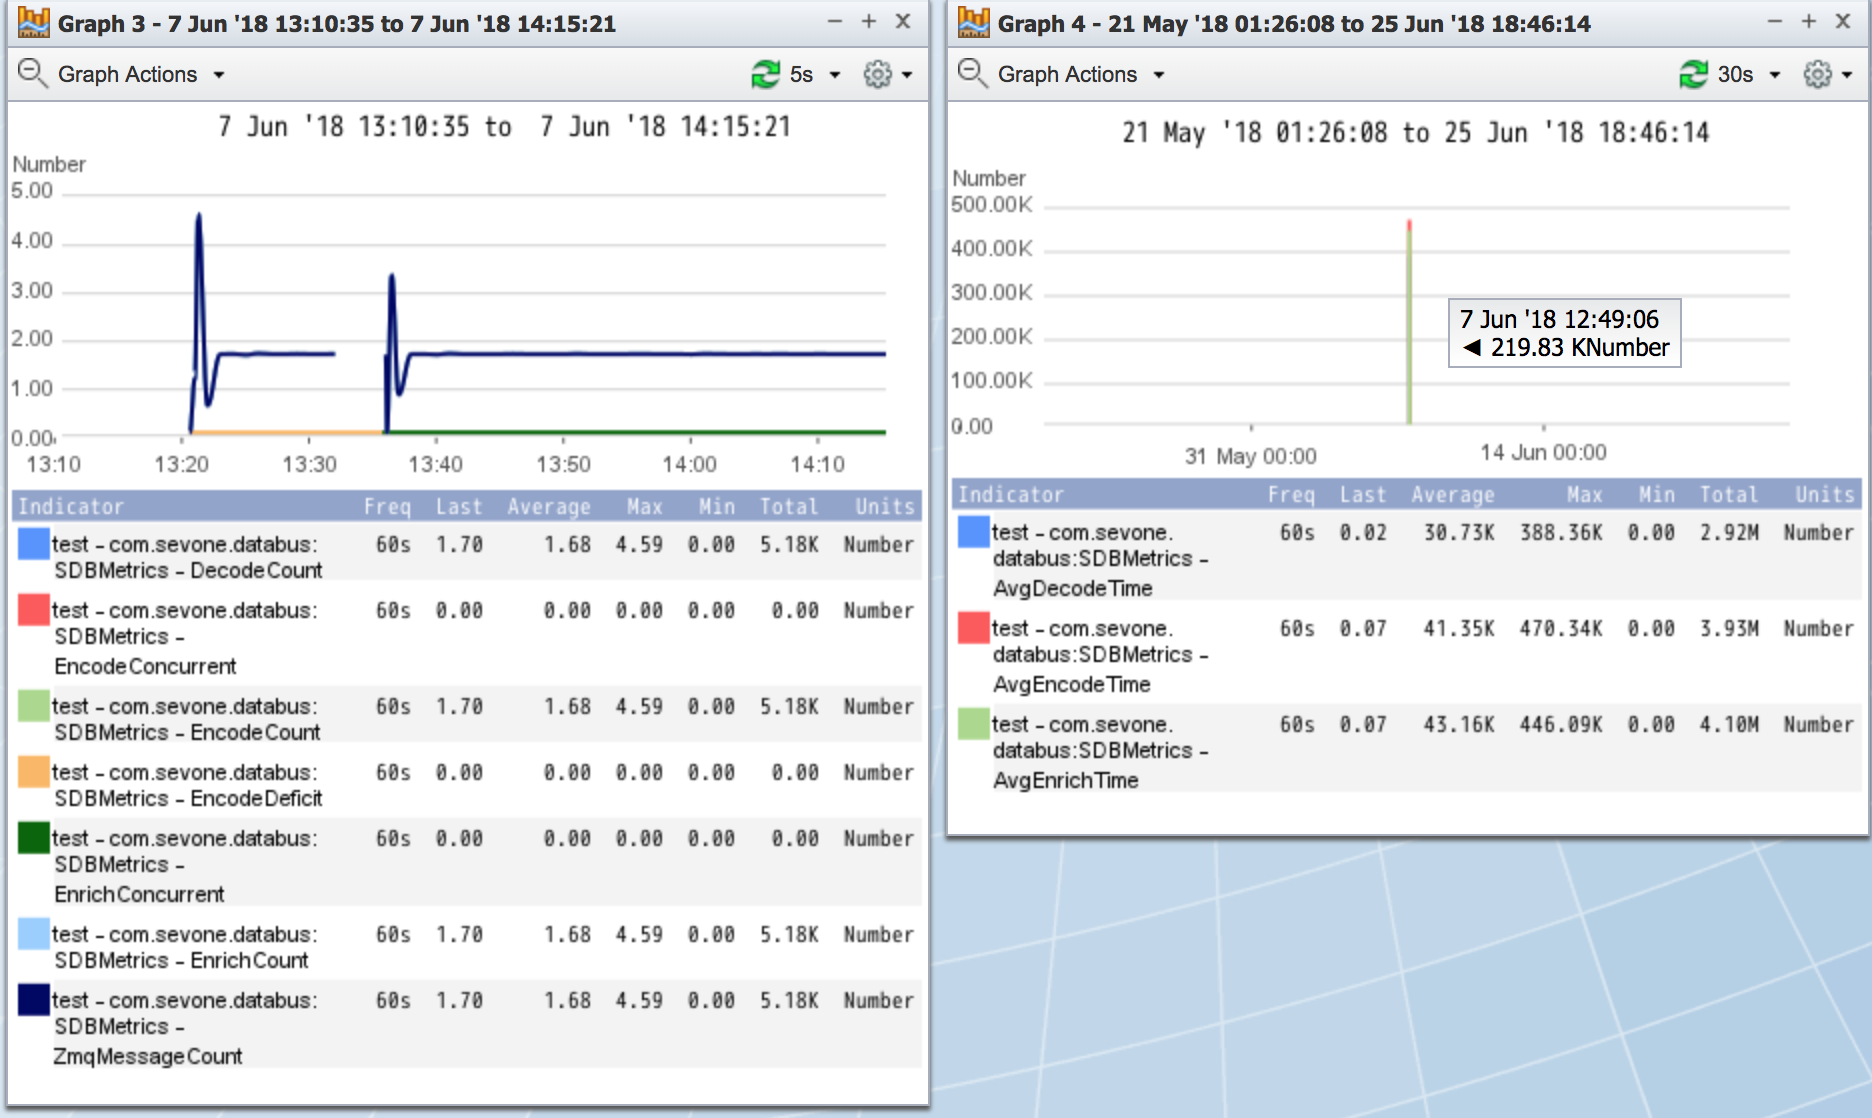
Monitor SevOne Data Bus for runtime metrics such as EncodeCount, DecodeCount, EncodeDeficit, AvgEncodeTime, etc. For example, create instant graph of these metrics in SevOne NMS.
Configuration
To enable JMX plugin for SevOne Data Bus, you need to execute database migration to add SevOne Data Bus JMX plugin information into the database. Moreover, you also need to change SevOne Data Bus config to set up JMX server inside SevOne Data Bus.
Database
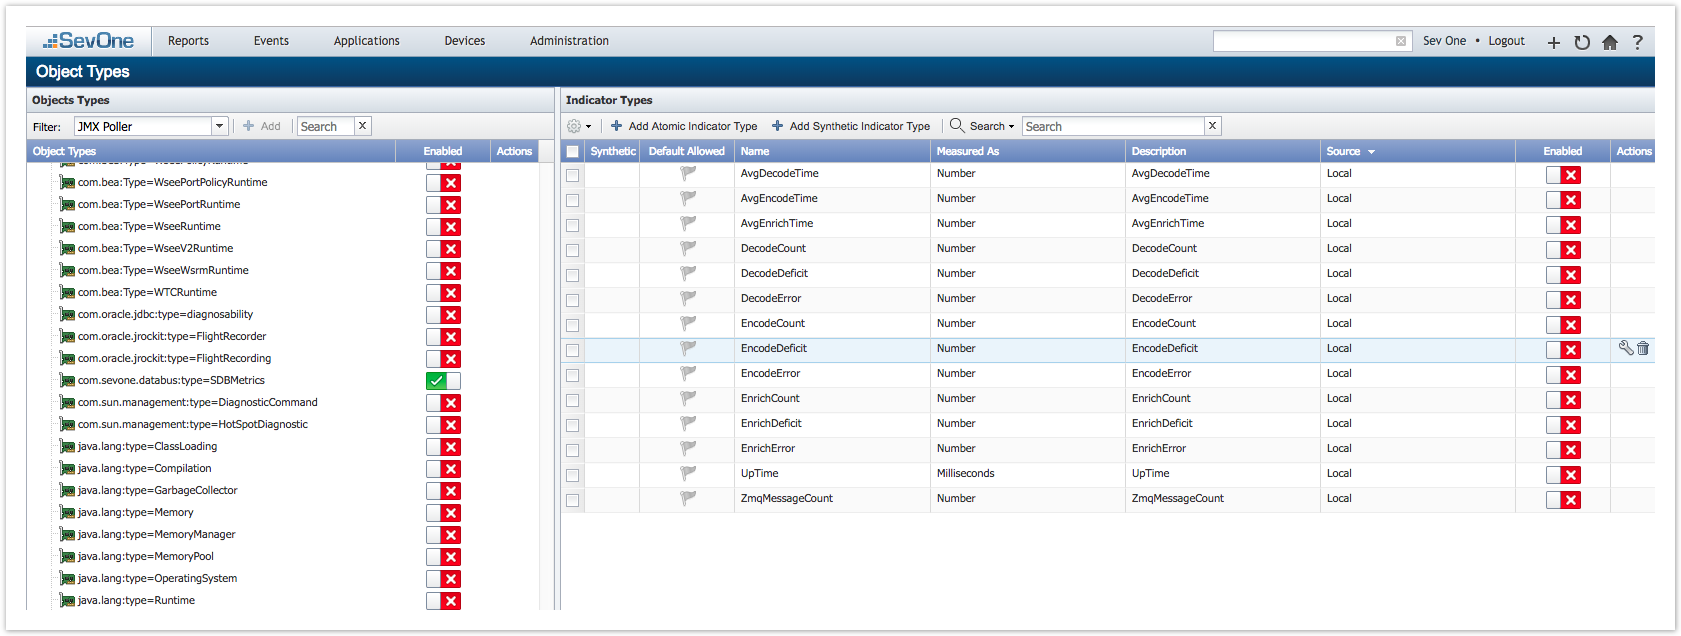
Database migration will be executed by the NMS installation. After successfully executing the migration, the corresponding plugin and indicators will show up in the GUI.
Please go to SevOne NMS GUI > Administration > Monitoring Configuration > Object Types > JMX Poller to enable / disable indicators.
NMS GUI
Device Manager
Enable JMX poller on the device you want to monitor.
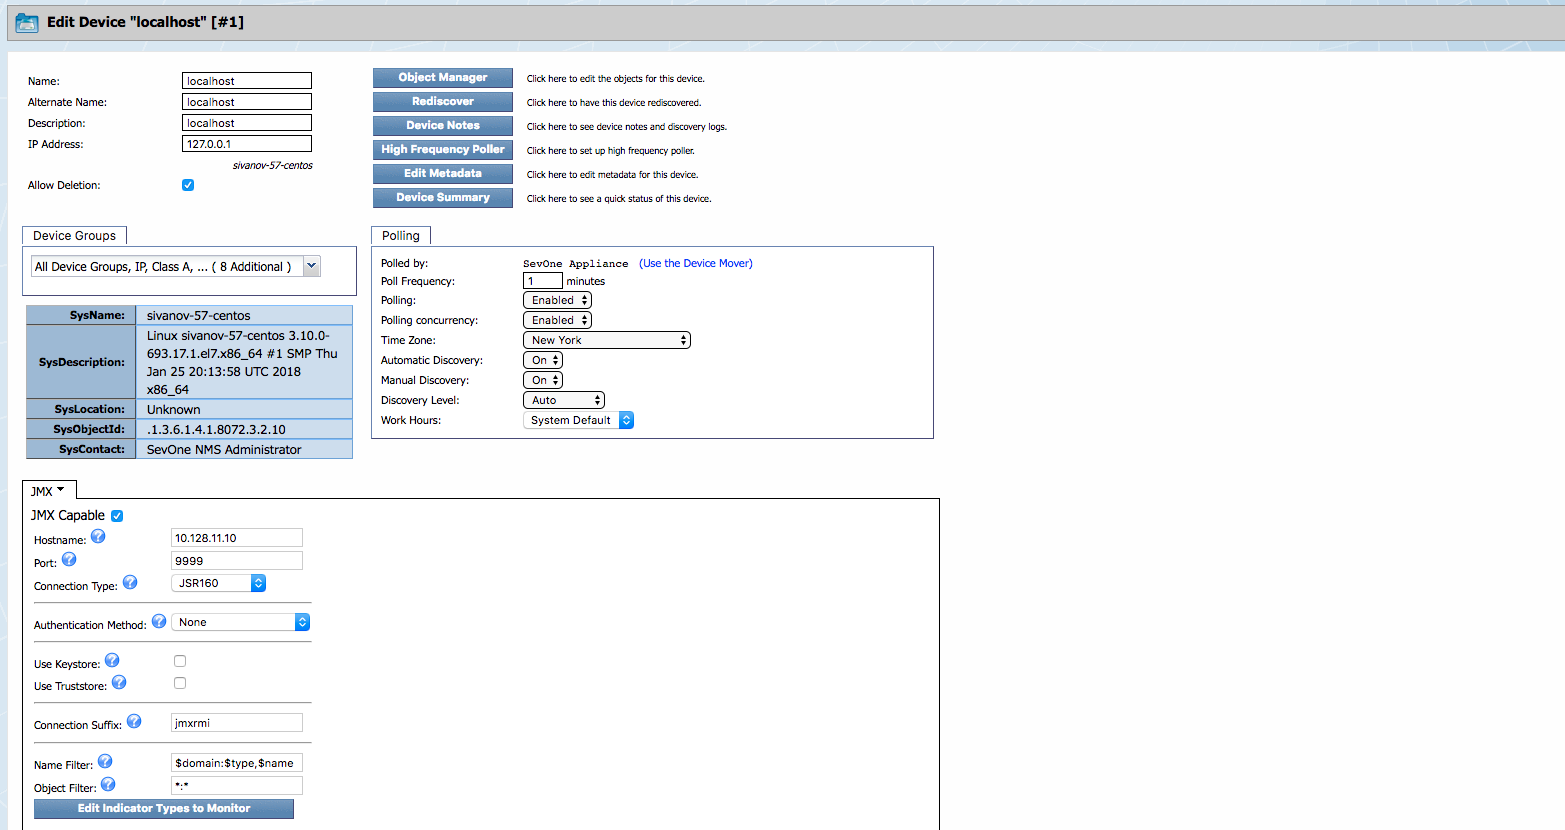
application.conf
You need to provide SevOne Data Bus with the host IP address and port number used for the JMX server - this will require a new section in config file. An internal server inside SevOne Data Bus will start at the same time SevOne Data Bus starts. This server can also be accessed through other applications such as JConsole.
Application.conf(v1.4)
version = "1.4"DATABUS { ... jmx { hostIP = "localhost" port = 9999 enabled = true } ...} ...Debug
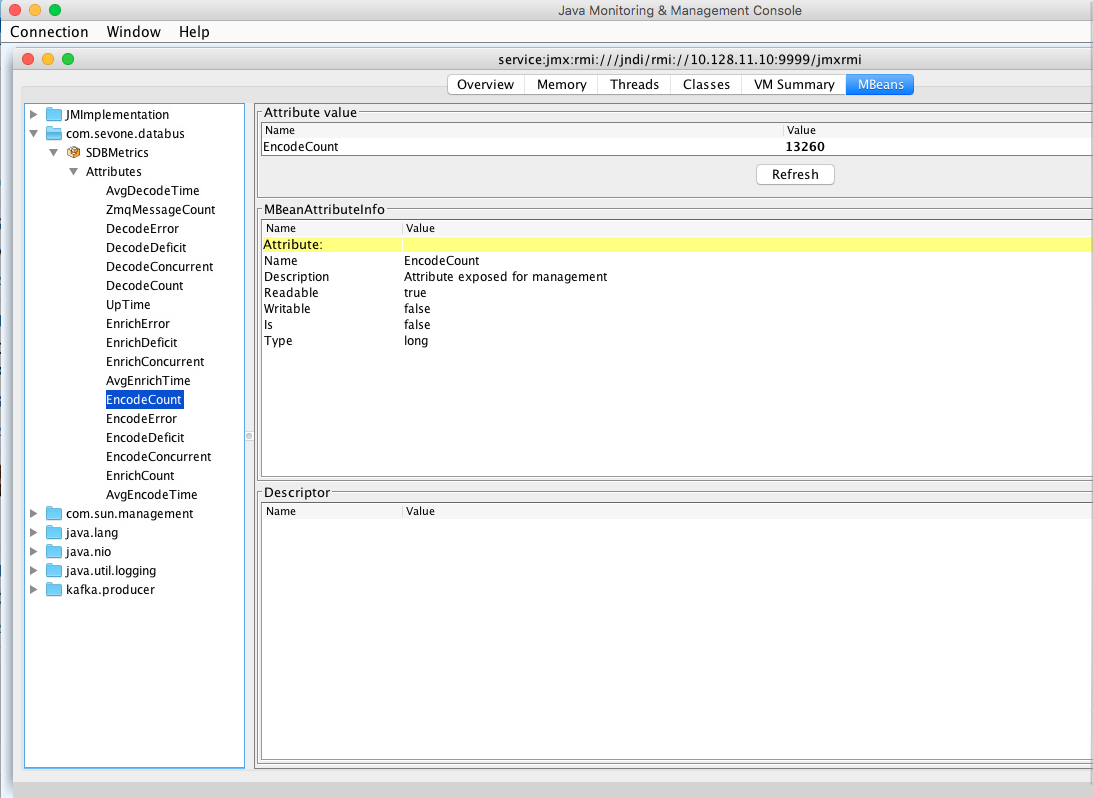
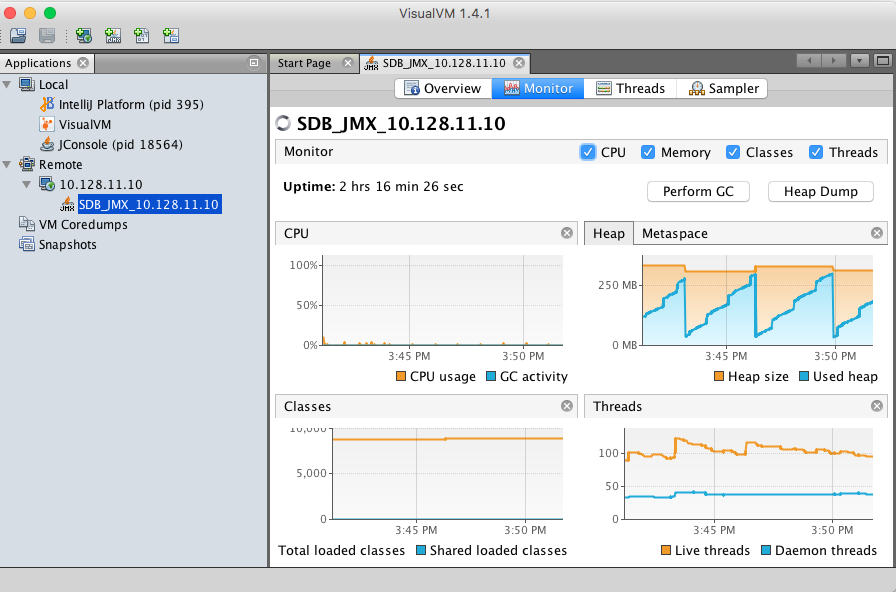
To make sure the metrics you have retrieved are correct, you can also make use of JConsole or VisualVM to get numbers through JMX server and compare those numbers with what you get from the traditional status page.
GUI View
SevOne Data Bus Troubleshooting
Configuration File
SevOne Data Bus is controlled by the configuration file located in /etc/sevone/data-bus/application.conf. Most common problems with SevOne Data Bus are a result of a bad configuration option. If SevOne Data Bus fails to start, check if:
-
the configuration file follows the correct structure from the template file provided
-
the comment line incorrectly wraps to start a new line
-
there is any NULL existing in the config file
Using SDB Status Page
SDB has a built-in web server that can show verbose statistics of its internal operations. The server can be accessed on the local host and the port is configurable in the /etc/sevone/data-bus/application.conf file.
Verify SevOne Data Bus Status
-
Go to SevOne Data Bus status page and check error counts. If a constant increase or a huge number of error counts are observed, a potential issue may be happening or has already happened.
-
Check SevOne Data Bus log file.
-
use grep -i 'Error' | grep -v 'SDB Metrics' to get all error messages
-
use grep 'Exception (count=' for filtering out Kafka publisher related errors
-
REST API
-
If there are any REST API issues, you may restart the REST API with supervisorctl restart SevOne-restapi.
-
Restart SevOne-data-bus
-
Ensure the REST API configuration section in the application.conf is correct.
Remote Kafka Broker
Manually verify Kafka broker connectivity on the box:
-
telnet BROKER_IP BROKER_PORT
-
Upon successful connection, expect to see message Connected to BROKER_IP
Caching
If there are any caching issues, you may restart SevOne-data-bus. Upon restart, the application will reload its caches entirely.
FAQs
How does SevOne Data Bus support HSA?
SevOne Data Bus does not currently run on the HSA. When a failover occurs, it needs to be started manually.
What is the bandwidth needed to stream the data?
52 MB/s (416Mbps) for a fully loaded PAS 200K is needed to stream the data.
What is the maximum supported latency?
Up to 250ms Round-trip Time latency for SevOne Data Bus is tested and supported.
Since SevOne Data Bus delivers all of the data, what scalability testing data is available?
All PAS200k data processing in real-time can be streamed - this is tested and supported.
Does SevOne Data Bus support multiple topics and if so, how many can it support?
SevOne Data Bus supports multiple brokers with a topic. So conceptually, it also supports multiple topics (the same broker configured individually for each topic). There are currently no specific limits tested, provided data is not duplicated across multiple brokers/topics.
Does SevOne Data Bus streaming affect SevOne NMS's ability to poll SNMP data?
The configuration used during scale testing did not impact SevOne NMS's ability to poll data.
SevOne Data Bus connection is lost
Will SevOne Data Bus try to reconnect once the connection is lost?
Yes, SevOne Data Bus will try to reconnect once the connection is lost. Kafka producer has retries configuration setting. If a connection is lost, Kafka producer retries the number of times retries setting is set to.
What happens to the messages that should have been streamed during the period when the connection is lost? Are they stored somewhere and retransmitted later on?
SevOne Data Bus's Kafka producer buffers messages for a short time when it is trying to reconnect to the external Kafka. If the connection comes back, the messages will be transmitted correctly, otherwise they are lost.
If there is a buffer, how many messages can it hold? What happens when it fills up?
SevOne Data Bus does not have a buffer and it will hold as many messages as possible. The only limitation is how much memory is allocated to JVM for SevOne Data Bus. For Kafka, how many messages can be buffered for each real send operation can be controlled. The buffered messages are sent out to Kafka broker when the Kafka send buffer is full.
Can flow data (metrics and/or flows) be exported via Kafka? If so, how can it be enabled?
Flow data (metrics and/or flows) cannot be exported via Kafka. Flows are ingested by DNC whereas metrics are ingested via the PAS. SevOne Data Bus does not see flows at all.
Due to the nature of flows and DNC scale consideration, it is best to redirect the flows to the receiving system because anything on DNC will likely impact the published scale numbers. DNCs are built for scale ingestion and not for publishing.