
Table of Contents (Start)
- Topics
- Introducing SevOne
- Login
- Startup Wizard
- Dashboard
- Global Search - Advanced Search
- Report Manager
- Report Attachment Wizard
- Report Properties
- Report Interactions
- Instant Graphs
- TopN Reports
- Alerts
- Alert Archives
- Alert Summary
- Instant Status
- Status Map Manager
- Edit Maps
- View Maps
- FlowFalcon Reports
- NBAR Reports
- Logged Traps
- Unknown Traps
- Trap Event Editor
- Trap Destinations
- Trap Destination Associations
- Policy Browser
- Create and Edit Policies
- Threshold Browser
- Create and Edit Thresholds
- Probe Manager
- Discovery Manager
- Device Manager
- New Device
- Edit Device
- Object Manager
- High Frequency Poller
- Device Summary
- Device Mover
- Device Groups
- Object Groups
- Object Summary
- Object Rules
- VMware Browser
- Calculation Plugin
- Cisco ACI Plugin
- Database Manager
- Deferred Data Plugin
- DNS Plugin
- HTTP Plugin
- ICMP Plugin
- IP SLA Plugin
- JMX Plugin
- NAM
- NBAR Plugin
- Portshaker Plugin
- Process Plugin
- Proxy Ping Plugin
- SNMP Plugin
- VMware Plugin
- Web Status Plugin
- WMI Plugin
- xStats Plugin
- Indicator Type Maps
- Device Types
- Object Types
- Object Subtype Manager
- Calculation Editor
- xStats Source Manager
- User Role Manager
- User Manager
- Session Manager
- Authentication Settings
- Preferences
- Cluster Manager
- Maintenance Windows
- Processes and Logs
- Metadata Schema
- Baseline Manager
- FlowFalcon View Editor
- Map Flow Objects
- FlowFalcon Views
- Flow Rules
- Flow Interface Manager
- MPLS Flow Mapping
- Network Segment Manager
- Flow Protocols and Services
- xStats Log Viewer
- SNMP Walk
- SNMP OID Browser
- MIB Manager
- Work Hours
- Administrative Messages
- Enable Flow Technologies
- Enable JMX
- Enable NBAR
- Enable SNMP
- Enable Web Status
- Enable WMI
- IP SLA
- SNMP
- SevOne Data Bus
- Quality of Service
- Perl Regular Expressions
- Trap Revisions
- Integrate SevOne NMS With Other Applications
- Email Tips and Tricks
- SevOne NMS PHP Statistics
- SevOne NMS Usage Statistics
- Glossary and Concepts
- Map Flow Devices
- Trap v3 Receiver
- Guides
- SevOne Implementation Guide
- SevOne Best Practices Guide - Cluster, Peer, and HSA
- SevOne Installation Guide - Virtual Appliance
- SevOne NMS Installation Guide
- SevOne SAML Single Sign-On Setup Guide
- Access Control Quick Start Guide - SevOne NMS 5.7
- Data Miner Quick Start Guide - SevOne NMS 5.7
- Flow Quick Start Guide - SevOne NMS 5.7
- Group Aggregated Indicators Quick Start Guide - SevOne NMS 5.7
- IP SLA Quick Start Guide - SevOne NMS 5.7
- JMX Quick Start Guide - SevOne NMS 5.7
- LDAP Quick Start Guide - SevOne NMS 5.7
- Metadata Quick Start Guide - SevOne NMS 5.7
- RESTful API Quick Start Guide - SevOne NMS 5.7
- Self-monitoring Quick Start Guide - SevOne NMS 5.7
- SevOne NMS Admin Notifications Quick Start Guide - SevOne NMS 5.7
- SNMP Quick Start Guide - SevOne NMS 5.7
- Synthetic Indicator Types Quick Start Guide - SevOne NMS 5.7
- Topology Quick Start Guide - SevOne NMS 5.7
- VMware Quick Start Guide - SevOne NMS 5.7
- Web Status Quick Start Guide - SevOne NMS 5.7
- WMI Quick Start Guide - SevOne NMS 5.7
- xStats Quick Start Guide - SevOne NMS 5.7
SevOne NMS Installation Guide
SevOne Documentation
All SevOne user documentation is available online from the SevOne Support customer portal.
Copyright © 2005-2020 SevOne, Inc. All rights reserved worldwide.
All right, title, and interest in and to the software and documentation are and shall remain the exclusive property of SevOne and its respective licensors. No part of this document may be reproduced by any means nor modified, decompiled, disassembled, published or distributed, in whole or in part, or translated to any electronic medium or other means without the written consent of SevOne.
In no event shall SevOne, its suppliers, nor its licensors be liable for any damages, whether arising in tort, contract, or any other legal theory even if SevOne has been advised of the possibility of such damages, and SevOne disclaims all warranties, conditions, or other terms, express or implied, statutory or otherwise, on software and documentation furnished hereunder including without limitation the warranties of design, merchantability, or fitness for a particular purpose, and noninfringement.
All SevOne marks identified or used on the SevOne website, as updated by SevOne from time to time, may be, or are, registered with the U.S. Patent and Trademark Office and may be registered or pending registration in other countries. All other trademarks or registered trademarks contained and/or mentioned herein are used for identification purposes only and may be trademarks or registered trademarks of their respective companies.
Introduction
The SevOne NMS software is loaded on your appliance. If you provide the IP address of the appliance to your SevOne Sales Engineer this has been entered for you.
This document describes what you must do to get the appliance up and running from the moment you open the box until you are ready to log on to the application. Please see the SevOne Implementation Guide for how to log on, how to build a SevOne cluster, and how to begin your SevOne implementation.
Create Support Account
SevOne Support is only a phone call away - +1-302-319-5400. Go to www.sevone.com/support and create a user account to enable SevOne Support Engineers to provide support services.
-
In the address field on your web browser enter www.sevone.com/support and press Enter.
-
In the Create New Account section enter the following information.
-
Your Full Name
-
Email Address
-
Phone Number
-
Company
-
-
Click Create Account.
-
Your account is created instantly. SevOne Support reviews the account validity within the next business day for account activation.
Multi-Peer and Hot Standby Appliance Implementations
The Cluster Manager provides an Integration tab to enable you to build your cluster and to add new appliances as peers into an existing cluster. See the SevOne Implementation Guide for details.
When your new appliance is a Hot Standby Appliance, perform the steps in chapter 2 to rack up and define the Configuration Menu settings then contact SevOne Support to ensure that the Hot Standby Appliance is appropriately implemented.
(Email: support@sevone.com - Phone: +1 302-319-5400)
Rack Up and Connect to Your Network
Perform the following steps to power on your new SevOne NMS appliances and to integrate them into your network.
-
Unpack your SevOne NMS appliance and identify each item.
-
Rail Kit
-
Cable Management Arm (CMA) Kit
-
Faceplate/Bezel
-
Power Cords
-
SevOne NMS Appliance
-
-
Install the appliance into a computer cabinet/rack. See the Rack Installation Instructions booklet located in the Rail Kit box.
Note: You will install the faceplate/bezel in a later step.
-
Connect a keyboard and a monitor to the SevOne NMS appliance. Typically you use the connections on the front of the appliance although you can use the connections on the back of the appliance.
Note: If you connect two monitors, only the monitor you connect to the front of the appliance displays.
-
Connect the network RJ45 cable to the eth0 port on the back of the appliance.
-
Plug in all applicable power cords: two cords for appliance (second for redundancy), one for monitor.
A green light flashes on the back and the network port light flashes but you have yet to power on the appliance.
-
Press the Power button on the top right corner on the front of the appliance to power on your SevOne appliance and power on the monitor.
-
Appliance front view.

Item
Ports, Panels, and Slots
Icon
Description
1
Left Control Panel
N/A
Contains the system health and system ID, status LED, and the iDRAC Quick Sync 2 (wireless) indicator.
The iDRAC Quick Sync 2 indicator is available only on certain configurations.
Status LED: Enables you to identify any failed hardware components. There are up to five status LEDs and an overall system health LED (Chassis health and system ID) bar.
Quick Sync 2 (wireless): Indicates a Quick Sync enabled system. The Quick Sync feature is optional. This feature allows management of the system by using mobile devices. This feature aggregates hardware or firmware inventory and various system level diagnostic and error information that can be used in troubleshooting the system. For more information, see the Integrated Dell Remote Access Controller User’s Guide at
Dell.com/poweredgemanuals.2
Drive Slots
N/A
Enable you to install drives that are supported on your system.
3
VGA Port

Enables you to connect a display device to the system.
4
Right Control Panel
N/A
Contains the power button, USB port, iDRAC Direct micro port, and the iDRAC Direct status LED.
5
Information Tag
N/A
The Information Tag is a slide-out label panel that contains system information such as Service Tag, NIC, MAC address, and so on.
-
Appliance rear view.

Item
Ports, Panels, or Slots
Icon
Description
1
PCIe expansion card slot(3)
N/A
The expansion slot(s) enable you to connect PCI Express expansion cards. If you have purchased an add-on NIC, it will be installed here.
2
Power supply unit (2)
N/A
Power supply.
3
NIC port (4)

The NIC ports that are integrated on the network daughter card (NDC) provide network connectivity. eth0 will be the left-most port.
4
USB 3.0 port (2)

The USB ports are 9-pin and 3.0-compliant. These ports enable you to connect USB devices to the system.
5
VGA port

Enables you to connect a display device to the system.
6
Serial port

Enables you to connect a serial device to the system.
7
iDRAC9 dedicated network port

Use the iDRAC9 dedicated network port to securely access the embedded iDRAC on a separate management network, see the Dell.com/poweredgemanuals
8
System status indicator cable port
N/A
Enables you to connect the status indicator cable and view system status when the CMA is installed.
9
System identification button

The System Identification (ID) button is available on the front and back of the systems. Press the button to identify a system in a rack by turning on the system ID button. You can also use the system ID button to reset iDRAC and to access BIOS using the step through mode.
-
Wait as the following messages appear when the appliance powers on (~ 3 minutes).
-
Configure Memory
-
BIOS Revision
-
SevOne
-
-
When the "SevOne NMS Version … Configuration Menu" appears, you are ready to proceed.
Appliance Network Configuration
The "SevOne NMS Version … Configuration Menu" enables you to enter your company's network settings onto the appliance. You need the following information:
-
System Name (Host Name)
-
Host IP address and sub-netmask
-
Broadcast address
-
Default Gateway IP address
-
DNS primary & secondary IP address
-
NTP (Time Server) IP address
-
SNMP Settings
-
Domain Name
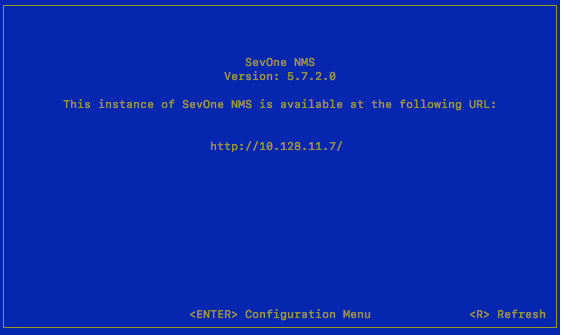
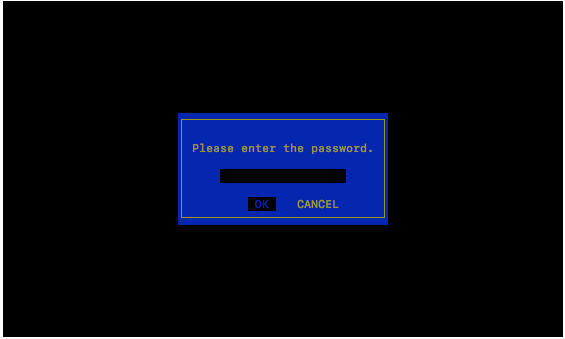
On the first page, press Enter to display the logon page that controls access to the Configuration Menu.
-
Enter the default password, supportuser .
When you log in here for the first time, you are logging as the user support. Steps for changing the default password for the support user are in the OS-level User Names and Passwords section. It is important that you change the default password.
Failure to change the default password presents a significant security risk.
-
Press Enter to display the system configuration menu.
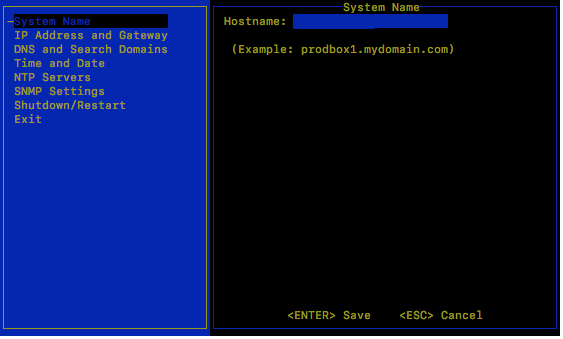
Press the down arrow to select System Name in the left menu and press Enter to display the System Name fields on the right.
-
In the Hostname field, enter the hostname for the SevOne NMS appliance.
-
Press Enter to save the System Name settings and return the focus to the menu on the left.
Press the down arrow to select IP Address and Gateway and press Enter to display the IP address and gateway fields on the right.
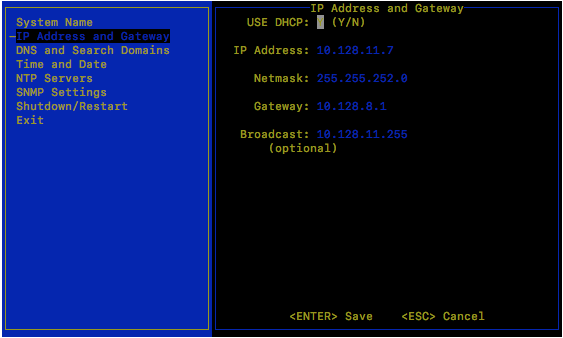
If your network uses DHCP, type Y to disable the following fields and skip the IP Address and Gateway steps. If your network does not use DHCP, type N and complete the following fields.
-
In the IP Address field, enter IP address of the SevOne NMS appliance and press Tab.
-
In the Netmask field, enter the netmask of the SevOne NMS appliance and press Tab.
-
In the Gateway field, enter the IP address of the SevOne NMS appliance and press Tab.
-
In the Broadcast field, enter the SevOne NMS broadcast IP address.
-
Press Enter to save the IP Address and Gateway settings and return the focus to the menu on the left.
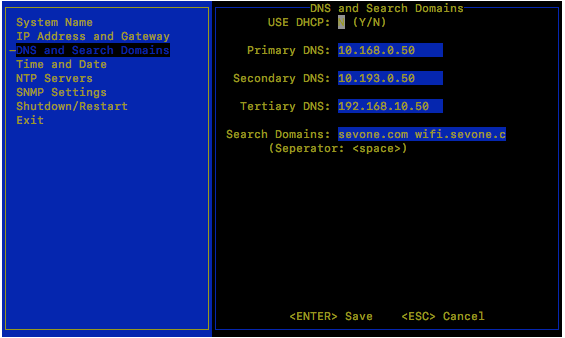
Press the down arrow to select DNS and Search Domains and press Enter to display the DNS and Search Domains fields on the right.
-
In the Primary DNS field, enter the IP address of the DNS server for SevOne NMS to use first and press Tab.
-
In the Secondary DNS field, enter the IP address for SevOne NMS to use second, if applicable and press Tab.
-
In the Tertiary DNS field, enter the IP address of the DNS server for SevOne NMS to use third, if applicable and press Tab.
-
In the Search Domains field, enter the domain names or IP addresses for the search domains for SevOne NMS to use (separated by a space).
-
Press Enter to save the DNS and Search Domains settings and return the focus to the menu on the left.
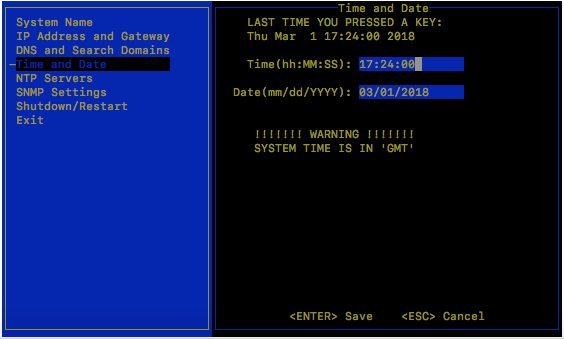
Press the down arrow to select Time and Date and press Enter to display the Time and Date fields on the right.
-
Confirm that the time and date are correct for Greenwich Mean Time (GMT) (a.k.a. Coordinated Universal Time (UTC)). This is the SevOne NMS system time. You define time and date settings for users, devices, and reports via the SevOne NMS GUI in a later step.
-
If needed, enter the time and date using the appropriate format in the fields provided.
-
Press Enter to save the Time and Date settings and to return the focus to the menu on the left.
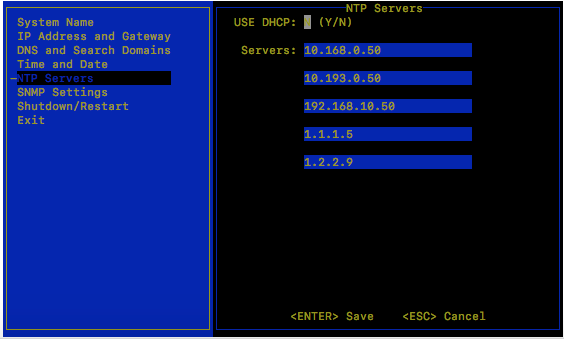
Press the down arrow to select NTP Servers and press Enter to display the NTP Servers fields on the right.
-
In the Servers field, enter the DNS name or IP address of the time server for SevOne NMS to use to maintain time settings.
-
Press Enter to save the NTP Servers settings and to return the focus to the menu on the left.
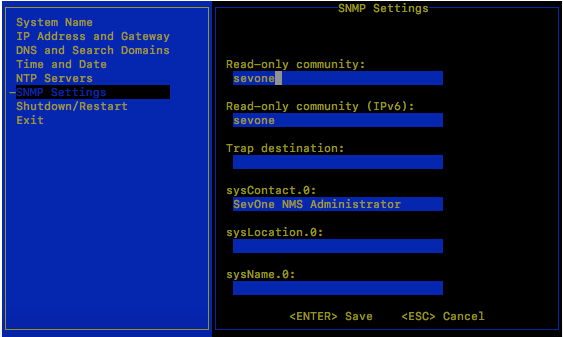
Press the down arrow to select SNMP Settings and press Enter to display the SNMP Settings fields on the right.
-
In the Read Only Community field, enter the SNMP read community string for other devices to use to poll SNMP data on this appliance when communicating via IPv4 and press Tab.
-
In the Read Only Community (IPv6) field, enter the SNMP read community string for other devices to use to poll SNMP data on this appliance when communicating via IPv6 and press Tab.
-
In the Trap Destination field, enter the IP address or hostname of the destination where traps this appliance generates are to be sent and press Tab.
-
In the sysContact.0 field, enter the text you get when you SNMP walk the sysContact OID and press Tab.
-
In the sysLocation.0 field, enter the text you get when you SNMP walk the sysLocation OID and press Tab.
-
In the sysName.0 field, enter the text you get when you SNMP walk the sysName OID.
-
Press Enter to save the SNMP Servers settings and to return the focus to the menu on the left.
If you changed the System Name settings or the IP Address and Gateway settings, press the down arrow to select Shutdown and Restart and press Enter to display a Shutdown option and a Reboot option on the right.
For all other configuration setting changes, you can press the down arrow to select Exit.
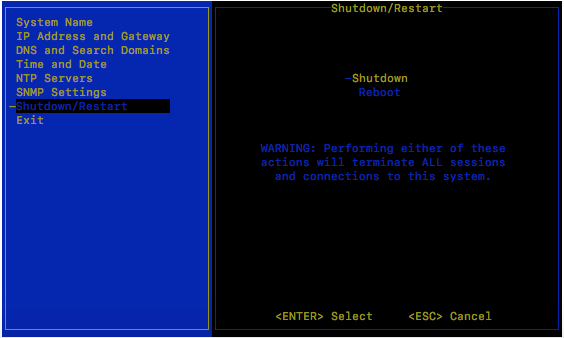
In the Shutdown/Restart section select an option and press Enter to shut down or reboot the SevOne NMS appliance.
If you select Exit, when you press Enter the initial Configuration Menu Welcome page appears.
You can now disconnect the monitor, disconnect keyboard, and install the SevOne faceplate/bezel.
Once you have gained access to the appliance and the appliance is part of the cluster, use SevOne-change-ip scripts instead of configshell to change the configuration of the appliance.
For details on advanced Network Configurations such as configuring Virtual IP (CentOS) or peer communication over NAT, please refer to SevOne NMS Advanced Network Configuration Guide for details.
OS-level User Names and Passwords
You will need to change the default passwords for the admin, root, and support user accounts. This is important for security reasons.
Failure to change the default passwords presents a significant security risk. This publication includes default passwords and this document has probably been made available to the public.
Change Admin Password
The admin user is not used by any SevOne utilities. It exists for administrators/customers. This password should be changed on all peers. Perform the following steps to change the password for admin.
-
SSH into your SevOne NMS appliance and log in as admin.
-
At the Password prompt, enter adminuser.

-
You will be prompted and required to change the admin user password. Enter a new password when prompted.
-
Exit the session when you are done.
Change Root Password
You must change the root password for new appliances when you SSH into the system. You will be prompted for the default password and will be required to change the password. This must be completed before incorporating the new peer into a cluster. Security concerns prevent incorporation of peers that use the default password.
SevOne NMS uses the root account for everything. This password should be changed on all peers. Perform the following steps to change the password for root.
-
SSH into your SevOne NMS appliance and log in as root.
-
At the Password prompt, enter dRum&5853.

-
You will be prompted and required to change the root user password. Enter a new password when prompted.
-
Exit the session when you are done.
Change Support Password
The support user is used by configshell. Configshell does not store the password for this account anywhere. You will need the password you specify here when logging in to configshell. This password should be changed on all peers. Perform the following steps to change the password for support.
-
SSH into your SevOne NMS appliance and log in as support.
-
At the Password prompt, enter supportuser.

-
You will be prompted and required to change the support user password. Enter a new password when prompted.
-
Exit the session when you are done.
Enable Firewall for CentOS
Prior to enabling firewalld , please make sure that iptable services are not being used. SevOne does not recommend using firewall and IPTABLES services at the same time as this is not supported.
On appliances that are running CentOS, the firewall will be disabled. This applies to both appliances with new SevOne NMS installs and appliances that were previously running Gentoo, then moved to CentOS. Perform the following steps to enable the firewall.
-
SSH into the appliance as root.
-
Execute the following command to enable firewalld:
$/usr/bin/systemctlenablefirewalld -
Execute the following command to start firewalld:
$/usr/bin/systemctlstart firewalld -
Execute the following command to identify custom ports:
$netstat-tuplet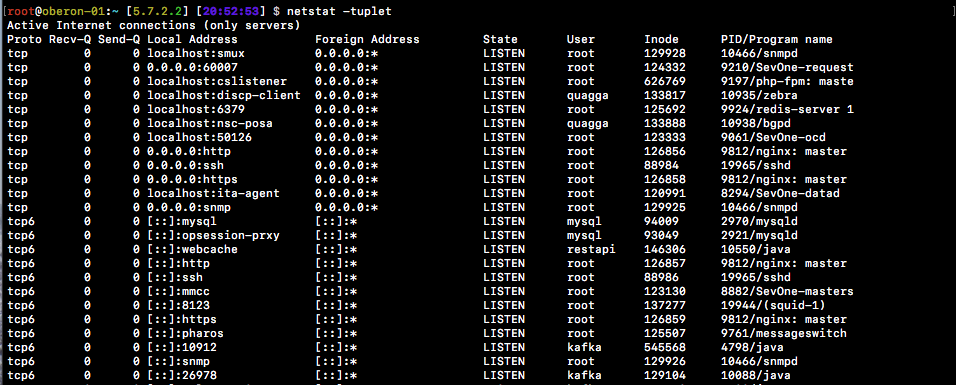
-
Execute the following command to add a custom port to the firewall. Replace <portNumber> with the number of the port you want to add. Replace <connectionType> with tcp or udp.
$ firewall-cmd --zone=public --add-port=<portNumber>/<connectionType> --permanent -
Execute the following command to reload the firewall and apply changes:
$ firewall-cmd --reload -
Exit the session when you are done.
Shut Down and Reboot SevOne NMS
SevOne NMS can run for extended periods of time. Occasionally it is necessary to shutdown or reboot an appliance. SevOne NMS stores data in cache and writes to the disk on a regular basis. The following shell commands back up the memory ring tables to the database on the disk to ensure that you do not lose data.
-
To shutdown SevOne NMS.
$ SevOne-shutdownshutdown -
To reboot SevOne NMS.
$ SevOne-shutdownreboot